Establishment of turfgrass brings beauty to any landscape. A well-established lawn creates an inviting view for passersby and supplies the perfect backdrop for other landscape elements, such as trees and shrubs. Well-established lawns are an asset to any home and have recently received attention for their positive health-related and environmental contributions. A healthy, vigorous lawn with good plant density provides these benefits:
- A 50 x 50-foot lawn releases enough oxygen for a family of four for one day.
- Lawns reduce surface temperatures by 30 to 40 degrees when compared with bare soil. Lawns reduce surface temperatures 50 to 70 degrees when compared with streets and driveways.
- The front lawns of eight homes are equivalent to about 70 tons of air-conditioning. The average air-conditioning unit for a home is 3 to 4 tons.
- A 10,000 square foot lawn can absorb 6,000 gallons of water with little runoff.
- Turfgrasses act as a natural filter by purifying the water passing through the root zone. It absorbs gaseous pollutants (such as carbon dioxide from motor vehicles).
The need to protect surface and groundwater quality is a serious environmental issue. Well-maintained lawns serve as buffers to prevent or minimize erosion and runoff that can have a negative impact on surface and groundwater quality. Proper management practices need to be followed to protect this environment. Turf professionals and homeowners can preserve and protect water resources by following these strategies.
Every turf establishment and maintenance decision you make has an effect on the ecosystem. These cultural practices are designed to maximize the rate of establishment while minimizing the risk to the watershed. This publication provides a discussion of cultural practices applicable to the establishment, protection and maintenance of a turfgrass ecosystem.
General steps to turfgrass establishment
- Rough grade
- Obtain a soil fertility test and fertilizer recommendations.
- Apply lime if needed
- Apply fertilizer as recommended by soil test
- Apply organic amendments if needed
- Till materials listed above into top 4 to 6 inches of soil
- Perform finish grading
- Apply starter fertilizer and work into top inch of soil
- Apply seed
- Rake or drag to cover seed lightly
- Roll lightly
- Mulch
- Water
- Mow
- Control weeds
Preparation of the site
You may not need to follow all of the above steps to establish your lawn. For example, the soil need not be tilled where grading and soil amendments are not required and when soils are not excessively compacted.
Before clearing or grading areas larger than one acre, check the Phase II Stormwater Runoff regulations and any local construction ordinances to determine if you must submit an erosion and sediment control plan.
Following are several ways to reduce and manage erosion and sedimentation during construction.
- Plan construction activities to minimize the duration of exposed soil.
- Limit the area of soil disturbance at any one time.
- Construct sediment traps and basins before other land-disturbing activities take place.
- Establish soil stabilization with plant materials as soon as possible after soil disturbance.
- Through controlled irrigation, manage runoff and keep velocities low.
- Break long slopes with diversions.
Once soil has been tilled, considerable time and effort are required to prepare a firm, granular seedbed (Figure 1). Where surface grade and soil physical conditions are acceptable, lawns can be re-established with minimal effort by killing the existing undesirable vegetation and incorporating seed into the surface. Bare soils and steep slopes, without proper cover, are highly susceptible to erosion. Sediment is the leading cause of stream impairment and pollution. Therefore it is vitally important to establish turfgrasses as quickly as possible after the soil is exposed.
Regardless of how the site is prepared, it is important that seed be incorporated into the top .25-inch of soil. On loose, bare soils, this can easily be done by lightly raking the seed into the surface. On hard compact soils or soils with existing vegetation and thatch, the seed should be mechanically incorporated into the soil by verti-cutting, slit-seeding or intense coring. Scattering seed on the surface without incorporation is a waste of time and money and may result in a poor stand of grass.
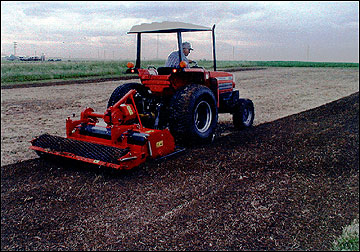 Figure 1
This roto-dairon prepares the seedbed for turfgrass establishment and also maintains the grade in a firm bed.
Rough grading
Proper attention to grading for surface drainage and conserving or developing topsoil will lead to easier care of your lawn in the years to come. Push aside existing topsoil when construction or excessive grade changes are required. Topsoil will be evenly spread over the site once the rough grading is completed.
When building a new home where a basement or foundation is dug, insist that the excavated subsoil not be combined with the existing topsoil. Trees, shrubs, ground covers and lawns never develop to their full potential in poor-quality subsoil. The initial investment in retaining on-site topsoil or amending poor-quality soils will avoid the agonizing replacement of plants that could not tolerate the poor soil environment.
The area should be rough graded with gentle slopes to adequately drain or divert surface water without erosion. Slopes with a 1-foot drop in 50 feet should be adequate, but slopes should not exceed a 1-foot drop in 15 feet. The finished grade should slope away from the foundation. On sites where topsoil is added over subsoil, be sure that the finished grade is at least 3 inches below the top of the foundation of basement homes. Surface runoff can cause basement flooding if water runs over the basement foundation. Remove all debris such as large stones, tree roots and discarded construction materials that will interfere with turfgrass root growth and water movement through the soil.
Soil testing
A soil test is needed to determine the lime and fertilizer requirements to ensure good turfgrass establishment and future growth. It is also important not to apply needless nutrients, if such nutrients are in sufficient supply. Many newly planted areas should be tested during the construction phase and every 1 to 2 years after that, depending on soil type and turf being grown.
Wait a minimum of 3 to 4 weeks after the last fertilization before sampling. Be careful to submit a sample for analysis that is truly representative of the area. Using a 1-inch-diameter soil probe, take 15 to 20 soil cores from each area being tested, and thoroughly mix the samples in a plastic bucket or paper bag. Do not use a metal bucket, which may affect results. Make sure your sampling equipment is clean and free of contaminants. Sample to a uniform depth, preferably 3 or 4 inches. Submit sample to a reputable laboratory for testing and interpretation. Samples can be submitted to your local MU Extension center or sent to the MU Soil and Plant Testing Laboratory, http://soilplantlab.missouri.edu/soil/. Soil testing and sample bags can be obtained from your local MU Extension center for a nominal fee. Send soil for analysis two months before your planting date to allow sufficient time to receive your fertilizer recommendations and to purchase and apply the appropriate materials.
Soil test results show your soil pH value and indicate whether lime will be required. A soil pH between 6.0 and 6.5 is optimum for turfgrass growth. When pH is optimum, other nutrients such as nitrogen, phosphorus and potassium are readily available from the soil for plant uptake. Lime is used to raise soil pH, and sulfur is used to lower pH. Phosphorus and potassium needs, if any, are also indicated on the soil test report.
Liming and fertilizing
Apply the amount of lime, phosphorus and potassium recommended on the soil test report for establishing a lawn. Where a soil test is not available, and if soils have required liming in the past but have not been limed for at least two years, apply 25 pounds of finely ground limestone per 1,000 square feet. Also apply 5 to 7 pounds of 0-46-0 phosphorus fertilizer per 1,000 square feet. Phosphorus is especially important for root development and seedling establishment. Because it is not very mobile in the soil, phosphorus should be incorporated in the root zone (top 4 to 6 inches of soil) during this step. Nitrogen and potassium are highly mobile in the soil and easily can be distributed by surface application.
Thoroughly till the lime and fertilizer materials into the surface 3 or 4 inches of soil. Do not exceed 3 pounds of 0-46-0 fertilizer per 1,000 square feet if nutrients are not to be incorporated into the top 4 to 6 inches of soil. These practices are aimed at building the basic soil fertility to an acceptable level.
Broadcast and work into the top inch of soil 10 pounds of 20-27-5 or 19-25-5 fertilizer or 12 pounds of a 16-25-12 fertilizer, or the equivalent, per 1,000 square feet. The fertilizer should be turf grade and contain 30 percent or more of the total nitrogen as water-insoluble or controlled-release nitrogen. Application at the recommended rate should provide adequate nutrition for the first two months of growth.
As an alternative starter fertilizer, apply 10 pounds of 10-10-10 or 12-12-12 farm-grade (soluble nitrogen) fertilizer or equivalent per 1,000 square feet (for example, 5 to 6 pounds of 20-20-20 fertilizer per 1,000 square feet). Using nitrogen fertilizers that contain only soluble nitrogen will necessitate additional nitrogen after six to eight weeks of growing weather.
Minimize fertilizer rates on slopes. The application of high rates of nitrogen and phosphorus fertilizers on slopes near surface water will increase the risk of degrading water quality. Use no more than half a pound of nitrogen per 1,000 square feet per application.
Do not apply fertilizers directly into lakes, drainage areas, and other bodies of water. Maintain a buffer zone (of at least 50 feet, depending on slope) of low-maintenance grasses or natural vegetation between areas of highly maintained turf and water. This prevents erosion and produces a trap or filter for unwanted nutrients. Use a drop or gravity spreader near bodies of water or impenetrable areas. Centrifugal or rotary spreaders should not be used near bodies of water because of the possibility of heavy granules entering the water.
Soil amendments
A soil test will indicate whether organic matter is required. Organic matter, such as peat moss or compost, can be added to clay soils to improve drainage and aerification. The same organic matter can be added to sandy soils to help hold water and nutrients in the soil. Fresh organic matter — manure, straw or fresh saw dust — is not usually recommended because it can cause a temporary nitrogen imbalance that will lead to slow growth and grass yellowing.
Reed-sedge peat and moss peat are also good sources of organic matter that tend to last longer in the soil than most other sources. Organic matter should be worked into the top 2 to 4 inches of soil before applying the starter fertilizer.
Final grading
Rake the area to the finish grade just before seeding. Light rolling will indicate any low spots or other irregularities to the area. A proper final surface will be firm enough to prevent ruts made by seeding equipment but will be loose and crumbly so that seed easily can be raked into the top 1/4 inch of soil. Once these steps have been completed, you are ready to install a turf by seeding or sodding.
Installation of turf
When to establish
Selecting the right time of the year to seed cool-season grasses is the most important factor in successful lawn establishment. The best time to seed cool-season grasses is between Aug. 25 and Oct. 1. Lawns seeded within a week of Labor Day are more likely to fill in completely by winter and produce a thicker appearance the following spring than lawns seeded in October.
Seeding in late summer is preferred because temperatures are warm enough to promote rapid germination if there is rain or irrigation. The cooler temperatures and shorter days of the approaching fall are ideal for further growth and development of seedling grasses.
Establishing cool-season grasses from seed in the spring can be extremely difficult. In some cases, complete failure should be expected. Rainfall or watering required to germinate turfgrass seeds during spring establishment will also promote excessive weed growth, especially crabgrass. If you are lucky enough to beat the crabgrass, expect to continue the battle with frequent summer irrigation to prevent moisture stress. Even if moisture is adequate, summer temperatures can severely thin or even kill seedling turf. The constant summer watering required by seedling turf will also increase the chance of Pythium damping off and brown patch. Both of these fungal diseases are encouraged by the same conditions that promote seedling growth — wet soils, frequent watering and summer nitrogen.
Sod of Kentucky bluegrass or tall fescue can be installed during most of the year except in midwinter when the ground is frozen. When extreme heat and drought conditions exist in summer, sod should be cut and laid during a 12- to 24-hour period. If done under drought conditions, the turf must be kept moist and cool. The soil should be watered enough to cool it before installation. It should be thoroughly watered again immediately after the sod is laid.
Turfgrass selection
Turfgrass selection is the most important cultural practice in turfgrass management and can have a major impact on turf and water quality. A quality lawn containing the recommended mixtures of species or blends of turfgrass varieties can be a difficult decision. Your selection of turfgrass species depends on how you manage your lawn and what you expect of your lawn. Grasses differ in adaptation, cultural requirements and performance. Managing a lawn requires decisions on frequency of mowing, a fertilizer program, and your choice to water your lawn or not and to use weed control (crabgrass preventers, etc.) or products to control turfgrass diseases and insects. Selections can also be based on existing environmental conditions (soil pH, soil type, level of moisture, degree of sunlight, topography) and the purpose for which the grass will be used. The answers to these questions will help you decide which species or mixture of species you wish to establish.
Species selection
Blends of Kentucky bluegrasses look rich with dark blue-green colors and have good resistance to brown patch disease, although they do require more inputs of fertilizer and water to maintain that rich cover through the summer months. They are also more susceptible to dollar spot, leaf spot and summer patch diseases. Selecting bluegrass varieties that offer resistance to some of these diseases is a practical first step in lawn establishment. Bluegrasses develop tillers and small rhizomes, which enable bluegrasses to recover from thinning or other problems.
Blends of turf-type tall fescues can give deep emerald green appearances with a slightly coarser texture than the bluegrass. They tend to be a deeper rooting plant, therefore requiring less water than the bluegrasses. They are not as susceptible to dollar spot and summer patch, but generally will require fungicides for the control of brown patch. Several varieties of turf-type tall fescues offer superior resistance to brown patch and therefore will improve turf quality. Tall fescues will tiller to help with recovery, but tend to be clumpy with severe thinning. Latest breeding efforts have produced several varieties of tall fescues with rhizomatous capabilities (e.g., Labarinth, Grande, Grande II).
Mixtures, such as turf-type tall fescues with bluegrasses (90 percent fescue, 10 percent bluegrass), combine the advantages of each species to mask their weaknesses. Mixtures with perennial ryegrass should not exceed 20 percent perennial ryegrass as it is susceptible to most of the diseases list above. Ryegrass is not very heat or drought tolerant and does not recover from thinning of cover. Unfortunately, many seed mixtures and blends available to homeowners at local garden centers contain large amounts of ryegrass (both annual and perennial) and fine-leaf fescues (creeping red fescues, hard fescues, etc.). Fine-leaf fescues have little tolerance for direct sunlight. They easily burn out.
So which varieties do you select once you decide on a species or mixture of species? Various resources provide recommendations for turfgrass varieties for Missouri. Garden centers, MU Extension publications and turfgrass specialists, and other lawn care experts are good sources for information about turfgrass selections and varieties. The difficulty for most individuals is to find the varieties suggested. Sometimes the best approach is to list what local sources carry and then cross-reference to the varieties recommended for Missouri.
Information for selecting varieties can also be found through the National Turfgrass Evaluation Program, http://ntep.org/. NTEP provides data tables for all turfgrass species for a number of different characteristics (quality, density, color, disease resistance, wear resistance, etc.) from best to worst, averaged nationally, by zones (transition zone) and by location, specifically Missouri (MO1). Therefore, varieties that will adapt best in Missouri can be determined through a number of reliable resources.
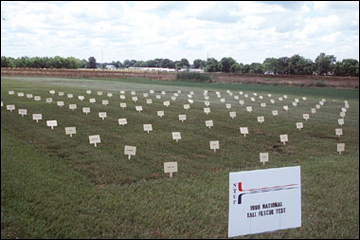 Figure 2
The National Turfgrass Evaluation Trials provide data on all turfgrasses to determine which varieties grow best in Missouri.
Seed tags
All grass seed bags have a seed label printed or pasted on the bag. Several pieces of information on the label should be considered before seed is purchased (Figure 3). A seed tag will list the species (Kentucky bluegrass, tall fescue, perennial ryegrass, etc.), variety name (Kenblue, Abbey, Plantation, Crossfire II, Shining Star, etc.), purity (should be greater than 90 percent), germination (should be greater than 80 percent), weed seed content ( percent) and noxious weed seed content ( percent) and testing date (should be 12 months or less). The species and variety name of the seed will tell you exactly what you're buying. As long as the purity and germination are acceptable, the next most important information to consider is the weed listings. The best products list 0 percent for weeds and noxious weeds. Any product containing weed seed will list the type of weed seed contaminating the turfgrass seed. Annual bluegrass (Poa annua) and rough bluegrass (Poa trivialis) are two weeds of concern because patches of these weeds will decline during the summer, creating unsightly spots in your lawn. It is best to avoid products with large amounts of these weed species. Avoid any seed product containing noxious weeds.
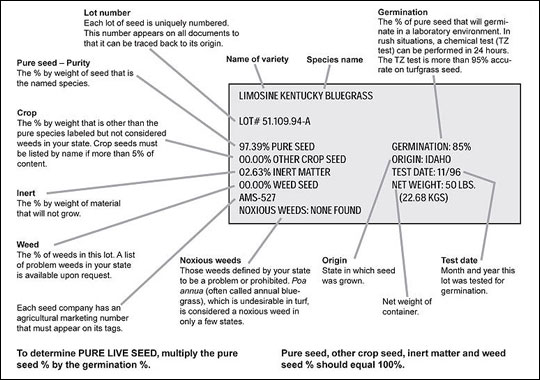 Figure 3
State seed laws differ slightly in how they require seed to be labled. This example covers basic labeling requirements.
Seed vs. sod
A quality lawn containing the recommended mixture of specific grass varieties and species can be established with either seed or sod. When seeding, however, there are many more species and varieties from which to select. Most sod grown in Missouri is straight Kentucky bluegrass or a mixture of mostly tall fescue combined with a small amount of Kentucky bluegrass. Some tall fescue sod is also available on plastic netting.
Initially, seed is less expensive than sod. However, successful establishment is more risky with seed than with sod, and if reseeding of certain areas or even an entire lawn is necessary, the overall expense may be less with sod. Also, the area is exposed to erosion because of the time required for seed to germinate and become well rooted in the soil. Sodding practically eliminates such problems, a consideration that can be especially important on steep hills or banks. Sod also reduces the chance of pesticide and nutrient contamination from surface runoff.
Sodding provides an immediately pleasing turf that is quickly functional, and it will compete with viable weed seed already present in the soil. Seeding usually requires intensive weed control during the first year of establishment.
Seed should be used to establish lawns only in early fall or early spring, whereas sod lawns can be established in nearly any season. Sodding of cool-season grasses in the spring is preferred to seeding.
Seeding
Before seeding, be sure that the soil has been prepared properly and is smooth and level.
Seed small areas by hand. A fertilizer spreader can be used in larger areas. When seeding by hand, try to apply five to 10 seeds per square inch. Heavier seedings will cause weak, spindly seedlings and spotty establishment. Calibrate spreaders to supply half the amount of seed in one pass over the area. Divide into two groups the amount of seed to be sown. Spread the first group of seed. Then spread the second group at a right angle to the first group.
Rake the seed to cover it with 1/8 to 1/4 inch of soil. Roll lightly to make good contact between seed and soil (Figure 4). Use a light layer of straw as mulch — one bale per 1,000 square feet. This helps hasten germination, keeps soil moist and protects young seedlings. The soil should remain moist from the surface to just below the active root zone.
At first, this moist zone will be shallow and require light, frequent irrigation. Use a fine spray to sprinkle seeds one to four times per day until young seedlings are established. As the grass develops, irrigate deeper and less frequently.
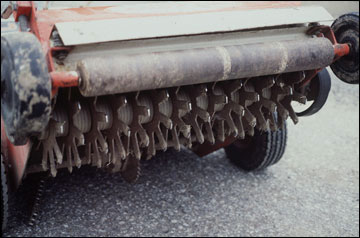 Figure 4
Verti-cutters and de-thatchers, with multiple blades set low enough to touch the soil surface, prepare an excellent seedbed and create good seed/soil contact for turfgrasses.
Sodding
Sodding is the installation of commercially grown turf. Sod has a carpetlike appearance consisting of green shoots attached to roots and soil. It usually comes in 3-foot sections, 18 inches wide, with less than 1/2 inch of soil attached (Figure 5). Sodding has the advantage of almost immediate establishment; disadvantages are its initial cost and the amount of labor involved.
Choose high-quality, actively growing sod. Sod is perishable and should not remain on the pallet or stack for more than a few hours. The presence of mildew and distinct yellowing of the leaves is usually good evidence of reduced turf vigor from being stacked too long.
To lay the sod, start at a straight edge such as a driveway or sidewalk. Unroll sod pieces tightly against each other, but don't overlap. Lay the pieces in a staggered, bricklike pattern. Using a sharp knife, cut pieces to fit curves or small areas. After the sod has been laid, roll it to ensure good contact with the soil. Be sure to water thoroughly, and water every day during dry, warm weather.
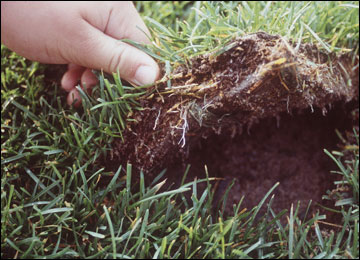 Figure 5
Sod can create an instant lawn, but care must still be given not to overwater. The development of white roots is a good indicator of healthy sod.
Watering
Newly seeded or sodded lawns require special irrigation. A newly seeded lawn requires daily watering and may need as many as four light waters in a single day if conditions are dry and windy. Keep the seedbed moist, but not saturated, to a depth of 1 to 2 inches until germination occurs (green cast to lawn and seedlings 1/4 to 1/2 inch tall). At this stage it is crucial that seedlings not be stressed to the point of wilt. Continue to water one to four times a day with light applications, approximately 1/8 to 1/4 inch of water per day. Straw applied at the time of seeding helps to shade the soil and to prevent rapid drying of the soil surface. It will also reduce soil erosion and seedling damage from the force of large sprinkler drops.
Watering with a light mist is best for establishing new lawns. As seedlings reach 2 inches, gradually reduce the frequency of watering and water more deeply. Begin mowing once a week when the seedlings reach a height of 3 inches. After the new lawn has been mowed two or three times, water deeply and infrequently.
Newly sodded lawns may require watering one or two times a day. Begin irrigation immediately after laying sod. Plan your sodding operation so that a section of laid sod can immediately be watered while other areas are being sodded. Sod should be watered so that the sod strip is wet as well as the top 1 inch of soil below the sod. The first irrigation requires about 1 inch of water to achieve complete wetting of the sod. After watering, lift up pieces of sod at several locations to determine whether it has been adequately irrigated. Continue watering one to two times a day or as needed with light irrigation to prevent wilting and to ensure a moist soil just below the sod layer. As sod becomes established and roots penetrate and grow in the soil, gradually reduce the frequency of watering but wet the soil deeper. After sod has been mowed two or three times water deeply and infrequently.
During hot, windy conditions, establishing sod may require several light mistings per day to prevent wilt and high, potentially lethal temperatures. Mist the sod lightly to wet the leaf surface and not to supply water to the soil. Misting cools the grass plant as water is evaporated from the leaves.
Do not overwater the soil because that will inhibit sod roots from growing into the soil. In situations where daily watering is not possible, thoroughly water the sod and soil to a depth of 6 inches. This will delay the rooting time of sod but will reduce the chance of rapid drying and severe loss of grass.
A soil probe can aid in the visual estimate of moisture content after seed or sod has established. This method helps you in watering to a depth just below the root system. Sloped areas, compacted soils and clay soils need to be watered in short, frequent intervals.
Although a turf plant obviously needs a certain amount of moisture to function, determining the necessary amount and frequency of water application is not that easy. However, proper watering reduces the potential for leaching and surface runoff, keeping water quality protected.
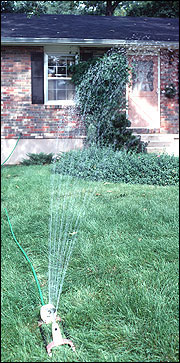 Figure 6
Water only as much as the soil can absorb at one time. For most soils, this is a quarter inch per hour. The rule of thumb is to prevent puddles and runoff.
Pesticide selection and use
Pesticides are sometimes necessary to keep pests at tolerable levels. These chemicals will continue to be an important part of any integrated pest management (IPM) program. However, sole reliance on chemical control can no longer be justified because of rising chemical costs, increased resistance to pesticides, and environmental concerns. Some pesticides can also enter surface groundwater either from leaching or runoff.
The selection of pesticides to be used on the turfgrasses should be based on many criteria including the pest to be controlled, the turfgrass species the pest is infesting, the season and growth stage of the pest, the level of control desired from the pesticide, the possibility of environmental contamination, and the need for frequent rotation of pesticides of different modes of action for the targeted pest to avoid pesticide-resistant weeds, diseases and insects. After all factors are considered, there may be two or three possible choices of pesticides for the control of the pest.
You should then select pesticides based on the pesticide leaching potential (PLP) rating (Tables 1, 2 and 3). A pesticide with a low rating is unlikely to move into groundwater or surface waters. A pesticide with a high ranking may be easily transported offsite, leach into groundwater, or persist long enough to allow it to enter surface or groundwater even though it moves more slowly. In areas with high leaching or runoff potential, you should use pesticides with a low PLP index.
PLP values given in Tables 1, 2 and 3 are based on the soil retention, persistence of the pesticide, rate of application, and percent pesticide reaching the groundwater. You should be aware that the PLP rating may change from site to site depending on microbial decomposition, soil pH, soil type photodecomposition (degradation from sunlight), or transformation of chemical properties due to exposure to light, volatilization (changing of solids and liquids into gases), and water volumes applied after pesticide application.
You should also keep in mind that leaching is only one of many considerations in selecting a pesticide. Sometimes, even though a pesticide exhibits low leaching potential, extra precautions may be necessary around water because of the pesticide's high potential toxicity to wildlife, such as fish or bees. These precautions should be mentioned on the label.
Table 1
Herbicides
Acclaim
- Common name
Fenoxaprop - Rate*
0.18 - Index**
0
Barricade
- Common name
Prodiamine - Rate*
0.75 - Index**
1
Many trade names
- Common name
Pendimethalin - Rate*
3.00 - Index**
18
Dimension
- Common name
Dithiopyr - Rate*
0.50 - Index**
20
Daconate
- Common name
MSMA - Rate*
3.00 - Index**
27
Team
- Common name
Trifluralin - Rate*
3.00 - Index**
32 - Common name
Benefin - Rate*
3.00 - Index**
36
Roundup
- Common name
Glyphosate - Rate*
4.00 - Index**
36
Ronstar
- Common name
Oxadiazon - Rate*
3.00 - Index**
36
Balan
- Common name
Benefin - Rate*
3.00 - Index**
36
Basagran T&O
- Common name
Bentazon - Rate*
2.00 - Index**
36
Many trade names
- Common name
2,4-D - Rate*
0.75 - Index**
41
Blade, Manor
- Common name
Metsulfuron - Rate*
0.10 - Index**
42
Gallery
- Common name
Isoxaben - Rate*
1.00 - Index**
44
Bensumec
- Common name
Bensulide - Rate*
10.00 - Index**
44
Turflon
- Common name
Triclopyr - Rate*
2.00 - Index**
53
Banvel
- Common name
Dicamba - Rate*
0.50 - Index**
54
MCPP
- Common name
Mecoprop - Rate*
1.75 - Index**
61
Tupersan
- Common name
Siduron - Rate*
10.00 - Index**
64
Trimec Classic
- Common name
2,4-D - Rate*
0.75 1.75 0.50 - Index**
41 61 54 - Common name
Mecoprop - Rate*
1.75 - Index**
61 - Common name
Dicamba - Rate*
0.50 - Index**
54
*Maximum recommended application rate (lb a.i. per acre)
**Pesticide Leaching Potential Index (0 to 100), where 0 = very low leaching potential and 100 = very high leaching potential.
Source: Adapted from Water Quality and Professional Turf Managers, A.H. Bruneau and L.T. Lucas, WQWM156, North Carolina Extension Service, 1995.
Table 2
Fungicides
Aliette
- Common name
Fosetyl-Al - Rate*
17.40 - Index**
25
Cleary's 3336
- Common name
Thiophanate-methyl - Rate*
2.70 - Index**
31
Chipco 26GT
- Common name
Iprodione - Rate*
2.50 - Index**
33
Fore
- Common name
Mancozeb - Rate*
8.70 - Index**
36
Bayleton
- Common name
Triadimefon - Rate*
1.30 - Index**
43
Banner
- Common name
Propiconazole - Rate*
1.50 - Index**
45
Subdue
- Common name
Metalaxyl - Rate*
1.36 - Index**
50
Banol
- Common name
Propamocarb - Rate*
7.24 - Index**
51
Rubigan
- Common name
Fenarimol - Rate*
2.00 - Index**
51
*Maximum recommended application rate (pounds a.i. per acre)
**Pesticide Leaching Potential Index (0 to 100), where 0 = very low leaching potential and 100 = very high leaching potential.
Source: Adapted from Water Quality and Professional Turf Managers, A.H. Bruneau and L.T. Lucas, WQWM156, North Carolina Extension Service, 1995.
Table 3
Insecticides
Tempo
- Common name
Cyfluthrin - Rate*
0.09 - Index**
0
Astro
- Common name
Permethrin - Rate*
0.90 - Index**
12
Award
- Common name
Fenoxycarb - Rate*
1.50 - Index**
19
Dursban
- Common name
Chlorpyrifos - Rate*
1.00 - Index**
19
Nemacur
- Common name
Fenamiphos - Rate*
10.00 - Index**
36
Achephate 75, Orthene, Adress
- Common name
Acephate - Rate*
3.00 - Index**
36
Turcam
- Common name
Bendiocarb - Rate*
4.10 - Index**
38
Sevin
- Common name
Carbaryl - Rate*
2.10 - Index**
39
Triumph
- Common name
Isazofos - Rate*
2.00 - Index**
44
Dylox
- Common name
Trichlorfon - Rate*
8.16 - Index**
52
*Maximum recommended application rate (pounds a.i. per acre)
**Pesticide Leaching Potential Index (0 to 100), where 0 = very low leaching potential and 100 = very high leaching potential.
Source: Adapted from Water Quality and Professional Turf Managers, A.H. Bruneau and L.T. Lucas, WQWM156, North Carolina Extension Service, 1995.
Using pesticides responsibly
The use of pesticides requires everyone to follow responsible application techniques. These techniques will ensure minimal impact on the environment and help to maintain the highest water quality.
- Develop and implement a quality IPM program, including proper training in pest identification.
- Train employees in proper pesticide application techniques.
- To save money and avoid disposal problems, determine the size of the area of application, and mix only the quantity of pesticide needed. The best way to dispose of excess spray mix is to spray it out according to the directions on the label, if area allows.
- Spot treat whenever possible. However, overspraying is a common mistake with this type of application. Spray only to wet leaf tissue.
- Read and follow all label directions. The label is a legal document set forth by the U.S. Environmental Protection Agency.
- Apply only pesticides labeled for turfgrasses and make sure your species of turfgrass is listed. Be sure the label includes your use of the turfgrass (residential, golf course, athletic fields, sod farms, etc.).
- Apply the pesticide at the correct time for the targeted pest. It is important to understand the growth cycles of your pest to ensure proper application timings.
- Note groundwater advisories on the label.
- Mix the pesticide and load sprayers and spreaders carefully to avoid spills. Always fill equipment outside the application site, preferably on a concrete driveway or sidewalk. Fill spray tanks away from wells or bodies of water.
- Prevent back siphoning by keeping the fill hose above the solution level of the spray tank.
- Use anti-backflow device or check valve on fill hose.
- Mix pesticides in areas where spills may be safely contained.
- Do not mix, apply or dispose of pesticides within 100 feet of your well.
- Consider closed systems for loading and mixing.
- Triple rinse containers, pour rinsate into tank, and spray excess on similar turf areas. Do not exceed label rates.
- Calibrate your sprayer or spreader. Refer to information provided with your equipment.
Weed control
Fall-seeded cool-season grasses
Fall seeding is much more successful than spring seeding because crabgrass, other summer annual weeds and summer stresses are not a problem. However, winter annual broadleaves such as henbit and chickweed may require control. These weeds germinate in September through November, grow during the winter and result in a dense mat of weeds by early spring.
If weeds dominate the new lawn in the fall, use a postemergence herbicide, such as 2,4-D or Trimec, after the lawn has been mowed two or three times, usually about 45 days after seed germination. Apply broadleaf herbicides on a warm sunny day in the fall when no frost is expected. (See label for temperature recommendations.) Winter annual broadleaf weeds can also be controlled in late March and April (Figures 7 and 8). Even though these weeds naturally die in May, without herbicide application, they should be controlled in early spring if they are overly competitive. A few weeds may be tolerated under natural conditions to avoid herbicide application.
Gallery may be an excellent choice to control winter annual broadleaf weeds with a preemergence application after turf seed germination but before weed seed germination. Follow the label directions for use.
If winter annual broadleaved weeds are left uncontrolled, turf will appear thin and weakened through the summer in areas where weeds have naturally died.
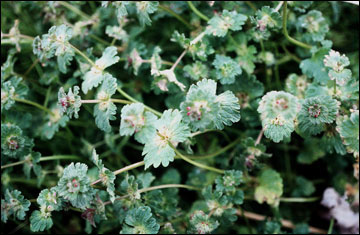 Figures 7 and 8
Winter annual broadleaf weeds like henbit, top, and chickweed, bottom, can compete with newly seeded turfgrasses in the fall.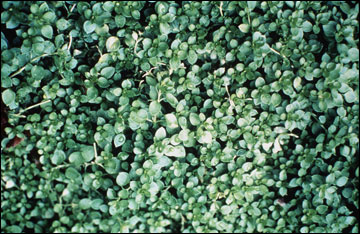
Spring-seeded cool-season grasses
Even though spring seeding of cool-season grasses is not as successful as fall seeding, spring and early summer seeding may be unavoidable. The following tips may help in your attempt to establish cool-season grasses in the spring. Keep in mind that Tupersan use in step 3, for the control of summer annual grasses, has the highest PLP index of 64.
- Seed as early as possible. In Missouri, wet spring conditions may prevent using equipment, especially on construction sites. Prepare soil and spread seed in February or March if conditions are dry. Seeds will lie dormant until warm temperatures cause germination.
- Consider using a slit seeder (Figure 9) or drill that causes minimal surface disturbance. This reduces competition from weed seeds that may be brought to the surface with complete tillage. This type of seeder is available from rental and hardware stores or garden centers.
- Competition from crabgrass is the major problem with spring seeding, especially when the lawn is seeded with Kentucky bluegrass. Bluegrass may require up to two weeks for germination, allowing summer annual weeds an opportunity to flourish (Figures 10 and 11), especially if there is a need to water. Siduron (Tupersan) is the only preemergent herbicide for annual grasses (crabgrass) that can be used with new spring seeding, and it will not harm the planted turfgrasses as they emerge. It should be applied as the final operation after seeding and before crabgrass germination.
- If lawn grasses are seeded in February or March, wait until mid-April to apply siduron so that crabgrass control will last longer into the summer. Shaded areas of the lawn do not need crabgrass control.
- Another alternative to siduron is the use of dithiopyr (Dimension). If lawn grasses are seeded in February or March, excellent germination may allow for two mowings by mid-April, therefore permitting an application of dithiopyr (PLP index of 20). Preemergent application of dithiopyr will control crabgrass, and it has postemergence control as well.
- After three or four mowings, at least a month after grass emerges, apply a low rate of 2,4-D or a three-way type of broadleaf herbicide on actively growing turf if broadleaved weeds appear to be overpowering the grass. Do not use herbicides if you do not have a serious weed problem — frequent mowing and proper starter fertilizer may be the only management necessary to establish turfgrasses. Broadleaf weeds can be easily controlled during the following year, provided the turf is able to initially establish without being crowded out by weeds.
- Use slightly higher seeding rates to ensure rapid cover and improve competition with annual weedy grasses (Table 4). Perennial ryegrass, while having the fastest germination rate and providing quick cover, may have the most difficulty surviving summer stresses. Tall fescue is the next best choice for showing a modest stand of grass by late spring. Germination time required for fescue is around 10 days. Kentucky bluegrass requires two or three weeks to germinate in the spring. It develops a modest stand of grass in the spring but may be overcome by many weeds by late summer.
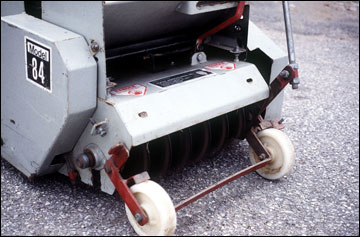 Figure 9
A slit seeder, top, plants turfgrass seed in furrows, middle and bottom. This method prevents seed from washing out during moderate rainfalls.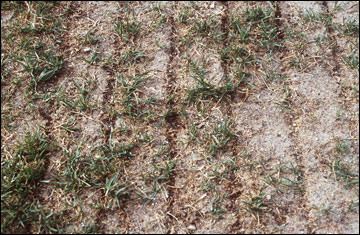
Figures 10 and 11
Competition from summer annual grassy weeds such as crabgrass (top) and goosegrass (bottom) requires early spring planting or use of siduron for preemergence control.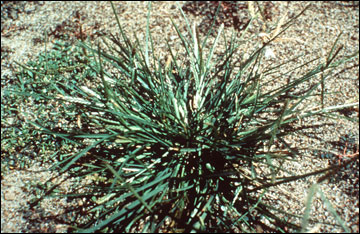
Table 4
Spring and fall seeding rates.
Kentucky bluegrass
- Higher spring seeding rate 4 (pounds per 1,000 square feet)
- Normal fall seeding rate 3 (lpounds per 1,000 square feet)
Tall fescue
- Higher spring seeding rate 10 (pounds per 1,000 square feet)
- Normal fall seeding rate 7 (pounds per 1,000 square feet)
Perennial ryegrass
- Higher spring seeding rate 10 (pounds per 1,000 square feet)
- Normal fall seeding rate 7 (pounds per 1,000 square feet)
Disease control
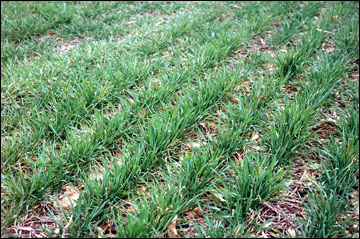
Seed decay and damping off caused by soilborne fungi can result in thinning and stand loss in newly seeded turfgrass areas. Seedling disease problems are most likely to occur when growing conditions are less than optimal for germination and emergence of turfgrass seed. New turfgrass stands established in the fall when conditions are optimal for growth of cool-season grasses are usually not subject to major disease problems and rarely require the use of fungicides (Figure 12).
Three common fungi associated with seedling disease in turfgrass are Pythium sp., Fusarium sp. and Rhizoctonia sp. Disease development is favored by high temperature and high relative humidity, so the most serious stand loss is likely to occur during the summer months. That's one reason why it is so difficult to seed in the summer. Because seeding in the late spring or early summer cannot always be avoided, it may be advisable to purchase fungicide-treated seed to help optimize establishment. Fungicide-treated turfgrass seed is not commonly available to the consumer, but some seed companies do treat seed.
In existing stands where renovation is needed to repair turfgrasses damaged by disease during the summer, seedling turfgrass may be lost. For example, in stands of perennial ryegrass killed by the gray leaf spot pathogen (Pyricularia grisea), overseeding with perennial ryegrass can result in seedling death. Emerging seedlings are exposed to high inoculum levels of P. grisea and the disease organism remains active until frost. To avoid this problem, make repairs with Kentucky bluegrass, which is not susceptible, or fescue, which is less susceptible than perennial ryegrass.
In the spring following fall seeding, disease can develop as early as April. Disease pressure should be minimal if care was taken to plant disease-resistant varieties of turfgrass species adapted to the site. Avoiding overfertilization with nitrogen in the spring will also reduce disease development.
Beginning with disease-resistant varieties of turfgrass species is the best step toward reducing potential disease problems. Maintaining turfgrass vigor by following good turf management practices in watering, fertilizing, mowing and aerifying can help defend against disease. Knowing the conditions that favor disease is one key to maintaining healthy turfgrass. This information helps the homeowner decide how to change management or cultural practices to favor the turfgrass and avoid disease. Another key is to identify the cause of the disease or other factors having a negative impact on turfgrass quality, before applying fungicide.
Questions or difficulty in identifying turfgrass disease may be directed to your local MU Extension center.
 Figure 12
Few problems with turfgrass diseases are noticed with fall plantings of turfgrasses. Diseases are more likely to take their toll in spring plantings.
Insect control
While insects are one of the most populous forms of animal life on earth, only a small number of insects may at some time become a potential problem in turfgrass. Turfgrass insects can be somewhat cyclical and dependent on a number of factors. Weather, suitable food sources, desirable habitat and predators all play a part in the population size of particular insect species.
Turfgrass damage is usually not observed until the number of insects reaches a threshold level. For example, a homeowner would not need to treat a yard with a pesticide if only one or two white grubs are found while doing yard work. However, if the homeowner peels back dead sod and finds more than five annual white grubs per square foot, then the homeowner would need to treat. Insects may always be present, but not always at damaging levels.
Turfgrass pests cannot be controlled over long periods of time solely through the use of pesticides. To have a healthy and vigorous turfgrass, it may be necessary to use pesticides in combination with sound cultural practices. A properly designed integrated pest management (IPM) system will not only maintain the control of existing pests but will also help prevent the reoccurrence of these pests and the possibility of new pest outbreaks.
Plan for possible pest problems before you plant. Keep records of problems in your lawn, and talk to neighbors about pest problems they have experienced.
A healthy, growing plant is the best defense against turfgrass pests. Many plants become more susceptible to pests if they are stressed. Following good turf management practices with mowing, proper watering, fertility, aeration, thatch control and overall sanitation (leaf litter, mulches and other debris) produces good, healthy, dense turf.
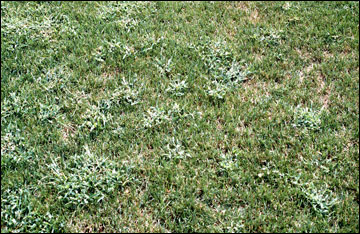
Turfgrasses established in the fall should have virtually no problems with insects or the need for insecticides. Insect problems could develop the following spring but will become more important in late summer when white grubs do most of their damage by feeding on turfgrass roots (Figure 13).
Turfgrasses established in the spring could face immediate insect pressure, compounding the pressures of summer stress. Use insecticides labeled for safe use on newly established grasses. Always read the label.
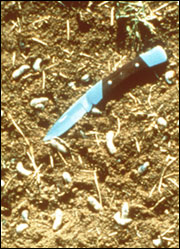 Figure 13
White grubs are a common reason for lawn renovation. With new fall seedings, they may not cause problems until late the following summer.
Identification and control products
The following is a list of the more common turfgrass insects in Missouri. If you have further questions or difficulties identifying a turfgrass insect, contact your local MU Extension center.
Species of white grubs
White grubs are the primary insect problem many homeowners face annually (Figure 14). Damage is usually noticed in late July to early August, although a species like black turfgrass ataenius will have two generations per year. Damage from the first generation can occur in late May.
Small or large patches of dead or dying grass will have roots pruned so that sod can be pulled up or rolled back like a loose carpet. Numerous C-shaped whitish larvae with a brown head will lie in the upper soil directly below the dead sod. Mammals, such as skunks, or birds digging for grubs can also cause additional turfgrass damage.
Adults are scarab beetles, including billbugs, black turfgrass ataenius beetle, green June beetle, Japanese beetle, masked chafers and May/June beetle. Clues to identifying white grub species are time of the year the grub is present, size of the grub, and raster patterns on the abdomen of the grub.
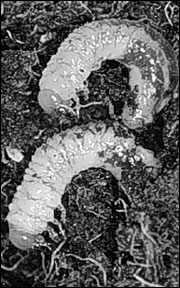 Figure 14
White grubs generally cause damage in late July to early August.
Subsurface-feeding insects
- Black turfgrass ataenius
Early damage from black turfgrass ataenius grubs appears as a wilted spot in the turf. Heavy infestations will kill the turf in irregular patches. Grubs (1/4 inch length) primarily feed on the roots of annual bluegrass, Kentucky bluegrass and bentgrass. Black turfgrass ataenius has two generations per year (May and August). Applications can be made in April or May to control overwintering, egg-laying adults. - Bluegrass billbug
Turf damage caused by billbugs can be confused with that caused by drought, disease, chinch bugs or white grubs. Billbugs cause spotty, dead patches of turf that is easily pulled up. Stems break off at the crown and are hollowed out or filled with a light brown frass. The best time to control billbugs is in May to kill the overwintering adults before egg laying begins. - Green June beetle. The feeding activity of these grubs rarely causes severe turf damage. Rather, the damage to a lawn generally is mechanical. The grubs burrow in and out of the turf, producing mounds. These beetles are attracted to soils with high organic materials. The decaying organic matter in the soil is the primary food for the grubs.
- Japanese beetle
Although some Japanese beetles have been found in Missouri, these beetles are not yet considered a threat. Grubs feed on roots of turfgrasses, causing a wilting appearance and gradual thinning. Dead turf sod can be rolled back under heavy infestations. Adult beetles can be damaging to leaves of both turf and ornamentals. White grubs should be treated in the first or second instar during July and August. - May/June beetle
The earliest symptoms of white grubs feeding on turfgrass roots is a gradual thinning and weakening of the stand. Damage may progress from sudden wilting of the grass, even with adequate moisture, to small patches of dead grass that easily peels back. These beetles have a three-year life cycle. Adult beetles can be damaging to trees and ornamentals. White grubs should be treated during late July to early August to control any newly hatched larvae. However, during the second year of the grub's life cycle, treatments can be made from April through September. - Masked chafer
Turfgrass infested with this species exhibits the typical white grub damage. Wilting, irregular dead patches of turf are the symptoms. This beetle has a one-year life cycle. Treat grubs about four weeks after the adult beetles start to emerge when egg deposits begin to hatch in late July to early August.
Surface-feeding insects
- Armyworms
Young larvae begin to feed on tender foliage. Feeding injury by the first two instars causes skeletonized foliage. The third through sixth instars consume all of the plant. When populations are high, feeding produces circular bare areas in turfgrasses. Treatments should be applied after midday, before nighttime feeding. This insect has several generations per year. - Chinch bugs
The chinch bug feeds by sucking sap from grass stems and foliage. They tend to favor shaded areas first. Damage starts as small, yellow or brown discolored areas. These areas expand as the insect population increases. Generally, control measures are needed during the summer generation only. Best control results when the entire lawn is treated. - Cutworms
Cutworm caterpillars feed at night and cut grass blades off close to the ground in a circular pattern around their burrows. This feeding produces brown spots 1 to 2 inches in diameter. Light infestations can be controlled by predators (birds) and parasites. Treatments should be applied and properly watered to move the product into the caterpillars' burrow. - Sod webworm
The appearance of irregular brown spots in the lawn is the first indication. Grass blades will be chewed off at or just above the soil surface. Fresh clippings and green fecal pellets are also present. Larvae live in silk-lined tubes in the thatch layer, so look for pencil- size holes in the thatch. Because larvae do all their feeding at night, treatments should be made in the early morning or late afternoon.
References
- Bruneau, A.H., and L.T. Lucas. 1995. Water Quality and Professional Turf Managers. Publication number: WQWM-156, North Carolina Cooperative Extension Service.
- Mugaas, R.J., M.L. Agnew, and N.E. Christians. 1997. Turfgrass Management for Protecting Surface Water Quality. Publication number: BU-5726-GO, University of Minnesota Extension.